Table of Contents
Getting Started Guide for iSquare ezyCheque Standard Edition 3
Setting up iSquare ezyCheque Standard Edition 3 is very easy.
Setting Up For The First Time
When you open iSquare ezyCheque Standard Edition 3 for the first time, you will be prompted with a Getting Started Wizard screen.
This Getting Started Wizard will collect your license key information, company contact information, and your user log-in information.
- License Key Information - License key will be provided to you when you purchase the full version.
- Company Contact Information - This company contact information is important for us to contact you.
- User Log-In Information - You will be required to input your username and password to be verified every time you open iSquare ezyCheque Standard Edition 3.
Adding A New Company
 After you have setup ezyCheque at the Getting Started Wizard, click on the
 Add Co. button to add new company at the Company Selection screen.
You will be prompted with a Add New Company Wizard screen which will collect the following information from you:
- New Company Type - select New Company with Clean Data.
- Company Information - the new company information.
- Company Logo - the company logo to be shown in Payment Voucher.
- Settings for Running Number - running number format for Payment Voucher.
- Database Master Password - password to protect the company database.
After you have fill up all the information, click Finish to create the company. Double click the company you just created in the Company Selection screen to open.
Creating A New Bank
You will need to create a bank record in order to start writing a cheque. Click on Banks Setup button on the main screen to open up the Banks Setup screen and click Add button to create a new bank.
You will be prompted with a Bank Setup Wizard screen. Please follow the steps below completely to understand how ezyCheque works for cheque's alignment setup. You can go to the user guide for advance details.
- Key in the
Bank Name,Bank Code,Account Number,Branch(the branch of the bank), andCurrent Cheque #.
Bank Codeis unique.
Current Cheque #will be used and saved in the Payment Voucher. - Select the
Printer NameandPaper Sourceto be used to print the cheque and clickNext >.
Select the
Paper Sourceonly if your printer has a separate paper tray for the cheques. Else leave it empty. - Select the
Templateradio button and the available template listed. For example, if you are adding a Malayan Banking Berhad's cheque, selectMalayan Banking Berhad.ebf. ClickNext >to continue.
If your bank are not listed and you are adding a Malaysian bank's cheque, select
Manual Adjustmentradio button and clickNext >.
 For other countries bank's cheque, you might need to adjust the date type and cheque size.
- If you are adding a Malaysian cheque either with a
Template, orManual Adjustment, clickNext >again to skip this Adjust Cheque's Fields Location page.
The fields are all adjusted accordingly for Malaysian cheque and you do not need to adjust anything.
If you are adding other countries bank's cheque, please follow the advance steps in user guide to adjust the fields.
- You will come to the Adjust Cheque's Printing Location page. Select the printing
Orientationand adjust the cheque location inQuick Alignbuttons base on your printer type and cickNext >.
This page is important to make sure the cheque is printed correctly. You might need to test print several times to make this setting correct. The steps for this setting has been created in a separate section here - Adjust Cheque's Printing Location. Please go to the section to fully understand and follow the steps before continue the following steps.
- Select your preferred amount in word's language and security style and click
Next >.
- Click
Finishto complete the wizard. You will need to wait for a few second for ezyCheque to complete this task.
Adjust Cheque's Printing Location
Cheque's Printing Location adjustment is the key step to make sure the cheque is printed correctly.
Below is a quick guide adjustment for each printers. Please follow the following instruction to set correctly.
| Printer Type | Orientation | Cheque's Location |
|---|---|---|
| Laser Printer |   | 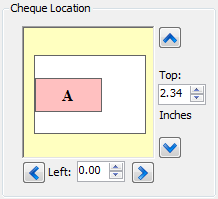 |
 |
||
| Ink Jet Printer |  | 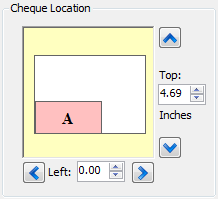 |
| Dot-Matrix Printer |  | |
  |  |
Laser Printer
Most of the laser printers in the market has a secondary tray for envelop or single paper and has a limited feeding mechanism. Hence, below is the recommended setting for laser printer:
| Orientation: | Portrait |
|---|---|
| Cheque's Location: | Middle-Left or Middle-Right |
| Cheque Placement: | |
At the Bank's Setup → Bank Setup Wizard → Adjust Cheque's Printing Location:
- Set the
OrientationtoPortrait , and click on the
 Middle-Leftbutton in the
 Quick Alignsection. - Insert a void / cancelled cheque in the center of the laser printer's secondary tray (or primary tray if your laser printer just has one standard tray).
If you do not have a void or cancelled cheque, you can print a mock cheque by clicking on the
Print Mock Chequebutton. You will need to cut the mock cheques out from the A4 paper and place it in the printer's tray. - Click
Print Samplebutton to test print and check whether all the labels are printed in the correct alignment. - If the labels are printed upside down, insert the same cheque but in reverse direction. Click
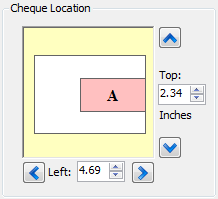
Print Sampleto test print again. Else, go to the next step. - If the labels can't be seen or printed far away in the cheque, adjust the location of the cheque by clicking on the
Middle-Rightbutton in the
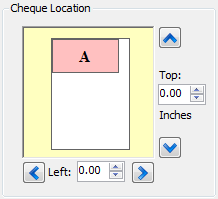
 Quick Align. Else, go to the next step. - If the labels are now mostly visible printed on the cheque, but the whole alignment is out, let's say a little away to the left, adjust the
Leftvalue inCheque Location, adding the value in CM or inches. If it is a little away vertically to the top, adjust theTopvalue inCheque Location, adding the value in CM or inches. - Insert the void / cancelled / mock cheque in the printer's tray and
Print Sampleagain. Repeat step 6 and step 7 until all the labels are printed correctly. - Click
Next >andFinishbutton to save the setting.
Inkjet Printer
Most single functioned inkjet printers has a feeding tray located at the top back of the printer, and has limited feeding mechanism. Hence, below is the recommended setting for inkjet printer:
| Orientation: | Portrait |
|---|---|
| Cheque's Location: | Bottom-Left |
| Cheque Placement: | |
At the Bank's Setup → Bank Setup Wizard → Adjust Cheque's Printing Location screen:
- Set the
OrientationtoPortrait, and click on the Bottom-Leftbutton in the
 Quick Alignsection. - Insert a void / cancelled cheque to the side of the inkjet printer's tray.
If you do not have a void or cancelled cheque, you can print a mock cheque by clicking on the
Print Mock Chequebutton. You will need to cut the mock cheques out from the A4 paper and place it in the printer's tray. - Click
Print Samplebutton to test print and check whether all the labels are printed in the correct alignment. - If the labels are printed upside down, insert the same cheque but in reverse direction. Click
Print Sampleto test print again. Else, go to the next step. - If the labels are now mostly visible printed on the cheque, but the whole alignment is out, let's say a little away to the right, adjust the
Leftvalue inCheque Location, subtracting the value in CM or inches. If it is a little away vertically to the bottom, adjust theTopvalue inCheque Location, subtracting the value in CM or inches. - Insert the void / cancelled / mock cheque in the printer's tray and
Print Sampleagain. Repeat step 5 and step 6 until all the labels are printed correctly. - Click
Next >andFinishbutton to save the setting.
Dot-Matrix Printer
Most dot-matrix printers has a feeding tray located at the top-back of the printer, and has a steady paper feeding mechanism. Hence, below is the recommended setting for dot-matrix printer:
| Setting 1 | Setting 2 | |
|---|---|---|
| Orientation: | Portrait | Landscape |
| Cheque's Location: | Bottom-Left | Top-Left |
| Cheque Placement: | | |
At the Bank's Setup → Bank Setup Wizard → Adjust Cheque's Printing Location screen:
- Set the
OrientationtoPortrait, and click on the Bottom-Leftbutton in the Quick Alignsection.
Or set theOrientationtoLandscape , and click on the
 Top-Leftbutton in the
 Quick Alignsection. - Insert a void / cancelled cheque to the zero (0) mark of the dot-matrix printer's tray, upside-down (cheque face facing down). Place the cheque base on the Orientation you set at step 1.
If you do not have a void or cancelled cheque, you can print a mock cheque by clicking on the
Print Mock Chequebutton. You will need to cut the mock cheques out from the A4 paper and place it in the printer's tray. - Click
Print Samplebutton to test print and check whether all the labels are printed in the correct alignment. - If the labels are printed upside down, insert the same cheque but in reverse direction. Click
Print Sampleto test print again. Else, go to the next step. - If the labels are now mostly visible printed on the cheque, but the whole alignment is out, let's say a little away to the right, adjust the
Leftvalue inCheque Location, subtracting the value in CM or inches. If it is a little away vertically to the top, adjust theTopvalue inCheque Location, adding the value in CM or inches. - Insert the void / cancelled / mock cheque in the printer's tray and
Print Sampleagain. Repeat step 5 and step 6 until all the labels are printed correctly. - Click
Next >andFinishbutton to save the setting.
Writing A Cheque
Writing a cheque with iSquare ezyCheque Standard Edition 3 is very fast and easy. You will be able to write and save cheque record at the Company Main screen - right afer you select the company.
At the Company Main screen:
- Key in the
cheque date,payee's name, andcheque amountin theChequesection. - Key in the
invoice number,invoice date,payment description, andinvoice amountin thePayment Vouchersection.The total of line items amount in
Payment Vouchershould equal to thecheque amount.You can quickly copy the
cheque amountto thePayment Voucherline item by clicking on theCopy Amountbutton. - Click
Writeto preview the cheque. Insert the cheque bearing the cheque number shown in the Print Preview screen in the printer's tray and clickPrint.The payee's name, cheque's detail, and payment voucher will be saved automatically after you print the cheque.
Printing Payment Voucher
At the Company Main screen, click on PV Records button or menu Bank → PV Records to open Payment Voucher Records screen.
- Double click at the record that you wish to print the payment voucher and click
Print PVbutton. Or; - Select the record that you wish to print the payment voucher at the Payment Voucher Records sceen and click
Print PVbutton.
Select more than one records in Payment Voucher Records screen to print them in bulk.
Saving Payee's Details
Payee's details such as address, phone number, fax number and email address will be shown in payment voucher. The details will be an aid for payment voucher issuer to contact the payee.
There are two ways to save payee's details:
- Click on the
 button on the right side of
 Payee's Namein Company Main screen to open Payee Record screen. Key in the details and clickSave. Or; - click on the
Payees Listbutton or menuTools→Payees Listat the Company Main screen to open Payees List screen. ClickAddbutton to add new payee details, orEditto edit the selected record.